Widgets
Accrue Pay Web Widgets are small self-contained web components that can be embedded anywhere in your web experience.
They provide information to the user about their wallet balance including available funds status and reward earning potential.
All widgets are customizable to fit the needs of your applications. Your dedicated account manager will assist you with all customizations.
Embedding widgets in HTML
First make sure that you are loading the main script in your page.
<html>
  <head>
    <script
      data-script="accrue-pay"
      defer
      src="https://pay[-sandbox].accruesavings.com/main.js"
      data-client-id="{your-client-id}"
    ></script>
  </head>
</html>
To display a widget, on any page where you have the main script loaded, place HTML tags using the following template:
<accrue-pay widget="{widget-name}"></accrue-pay>
Loading required data
Refer to the Loading widget data guide for more details.
At this point you should have the widget data ready to be passed to the Accrue Pay main script.
Passing the cart total value
Some widgets require the current cart total value to be able to support additional calculations.
The amount passed needs always to be a positive integer representing the amount in the smallest currency unit (e.g., 100 cents for $1.00)
During the initial load of your page, please wait for the Accrue Pay script to be ready before calling the following method to update the amount:
document.addEventListener("AccruePay::Ready", () => {
  window.accruePay.setAmount(9999);
});
You can always update the amount afterward, whenever it changes, by calling again the following method:
window.accruePay.setAmount(9999);
Wallet Widgets
To fetch required data for "Wallet Widgets", please use the following Merchant API endpoint: GetWalletWidgetData
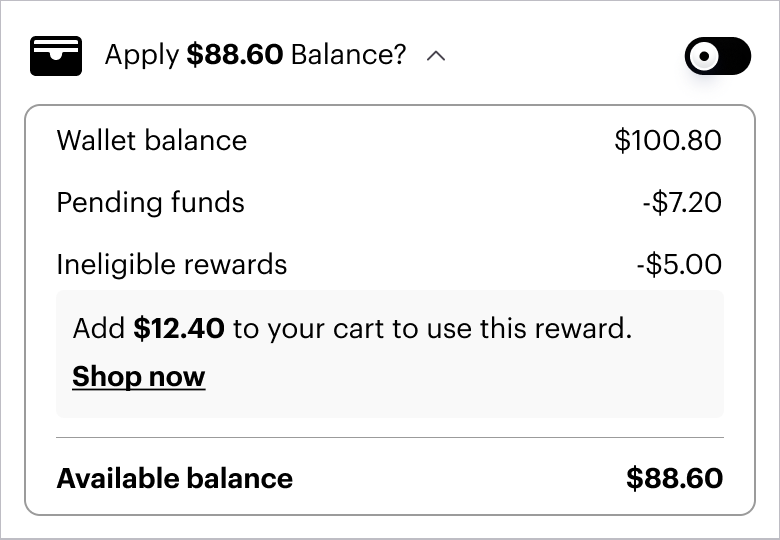
Balance
Used to display a user's available wallet balance and to allow them to apply that balance to a given order.
<accrue-pay widget="wallet-balance"></accrue-pay>

Example calculations
Setup example
<html>
  <head>
    <!-- If you want to autoApply the balance toggle, you can set this property to "true" -->
    <!-- data-balance-applied="true" -->
    <!-- If you want to auto hide the balance toggle, you can set this property to "true" -->
    <!-- data-hide-balance-toggle="true" -->
    <script
      data-script="accrue-pay"
      defer
      src="https://pay[-sandbox].accruesavings.com/main.js"
      data-client-id="{your-client-id}"
      data-wallet-widget="{data.attributes.payload}"
    ></script>

    <script>
      document.addEventListener("AccruePay::Ready", () => {
        // Type of `payload`: { isApplied: boolean; amount: number; }
        window.accruePay.onApplyBalanceToggle((payload) => {
          // Your own logic whenever the apply balance is toggled
          console.log("APPLY BALANCE TOGGLED", payload);
        });
      });
    </script>
  </head>

  <body>
    <accrue-pay widget="wallet-balance"></accrue-pay>
  </body>
</html>
If you want to autoApply the balance toggle, you can set this property to "true":
window.accruePay.setBalanceApplied(true);
You can control the visibility of the apply balance toggle using the setHideBalanceToggle method. Pass true to hide it, and false to show it.
window.accruePay.setHideBalanceToggle(true);
Rewards Preview
Used to display the rewards a user will earn for completing a given purchase.
<accrue-pay widget="wallet-rewards"></accrue-pay>

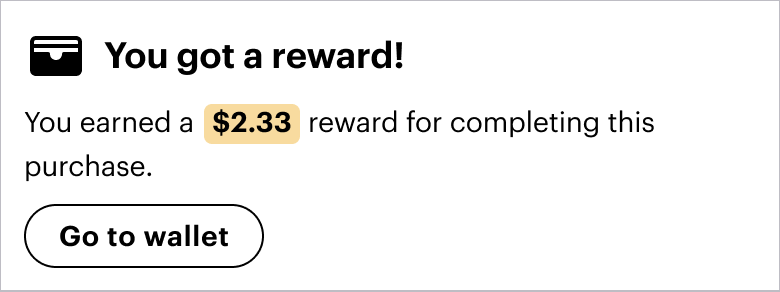
Payment Success
Used to display the rewards a user earned to their wallet for completing a purchase.
<accrue-pay widget="wallet-payment-success"></accrue-pay>
Go to wallet event
<html>
  <head>
    <script
      data-script="accrue-pay"
      defer
      src="https://pay[-sandbox].accruesavings.com/main.js"
      data-client-id="{your-client-id}"
      data-wallet-widget="{data.attributes.payload}"
    ></script>

    <script>
      document.addEventListener("AccruePay::Ready", () => {
        window.accruePay.onGoToWallet(() => {
          // Your own logic to open the Accrue wallet widget
          console.log("GO TO WALLET PRESSED");
        });
      });
    </script>
  </head>

  <body>
    <accrue-pay widget="wallet-earned-rewards"></accrue-pay>
  </body>
</html>