Using Payments API
Implementing the Payment Intent Flow with Accrue Pay
Introduction
This guide provides a comprehensive overview of the Payment Intent flow within Accrue Pay's Merchant API. Payment Intents represent a customer’s intent to make a payment and are used to track and manage a payment’s lifecycle from creation to settlement.
What is a Payment Intent?
A Payment Intent is a key object that:
- Captures the customer’s selected payment method (Accrue Wallet or Bank Account)
- Represents their choices at checkout
- Manages payment authorization, capture, and settlement
- Tracks the state of a payment across its entire lifecycle
End-to-End Integration Flow
The following diagram outlines the full integration journey across Customer, Merchant Frontend, Merchant Backend, and Accrue Pay:
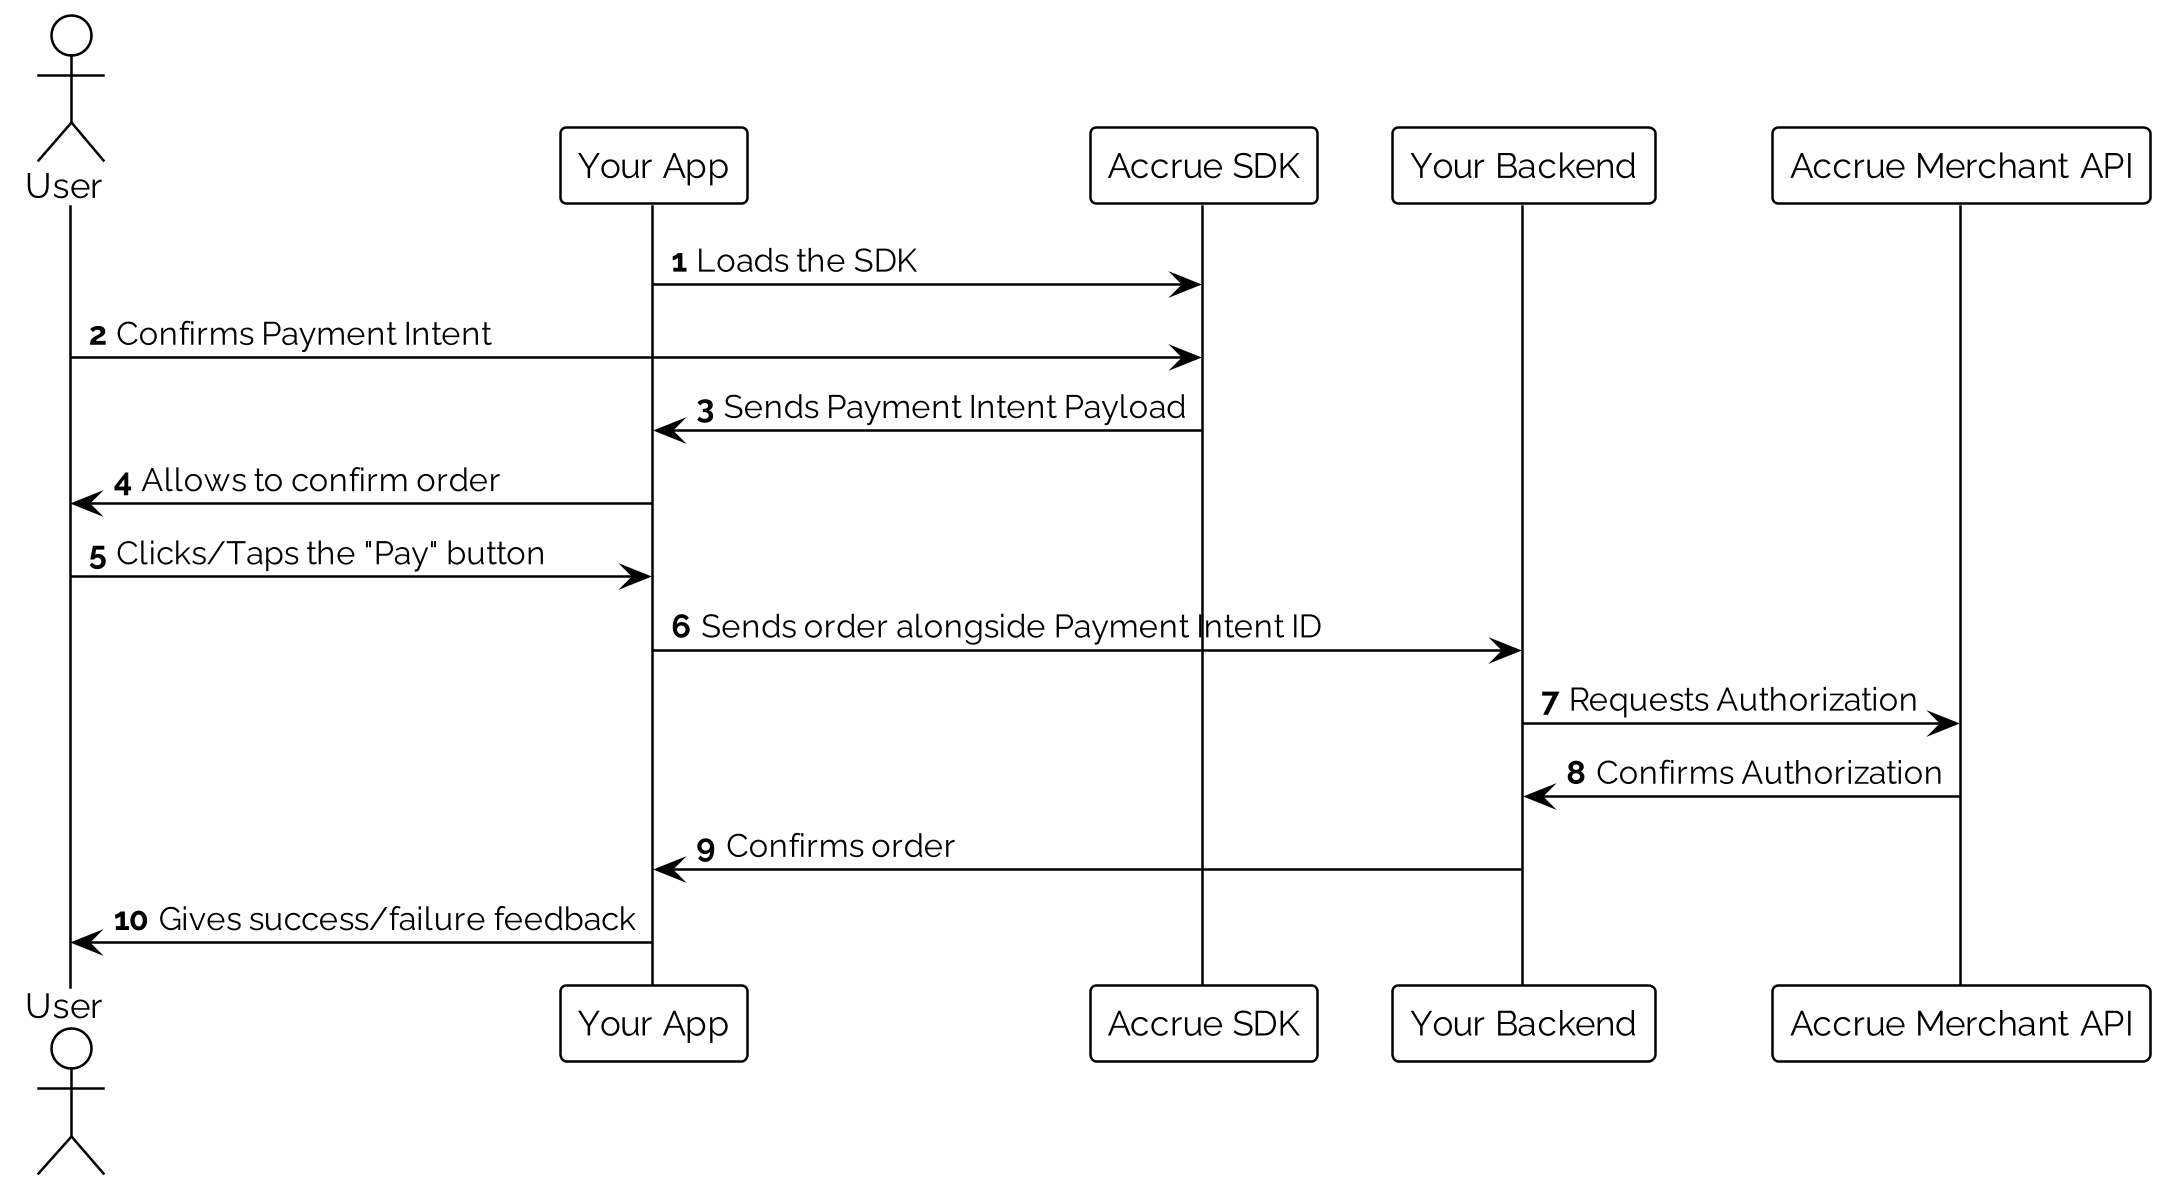
Flow Overview
-
Customer Interaction (Merchant Frontend)
- Customer selects Accrue Pay at checkout
- Completes checkout flow with either Wallet or Bank Account
- Completes any necessary authentication
- A Payment Intent is created via the frontend SDK
-
Frontend to Backend Handoff
- The frontend sends the Payment Intent ID to your backend
- The backend prepares to authorize the intent
-
Backend Processing
- Authorizes the Payment Intent, converting it into a Payment
- Captures the authorized payment
- Confirms success and updates the order status
-
Finalization
- Merchant fulfills the order
- Accrue Pay settles funds based on the agreed schedule
Detailed Payment Intent Flow
1. Creating a Payment Intent
A Payment Intent is initiated when the customer selects Accrue Pay and a payment method. The frontend SDK handles:
- Presenting payment method options
- Authenticating the user
- Initiating the Payment Intent object with the selected method
2. Authorizing a Payment Intent
Once the Payment Intent is created, your backend must authorize it. Authorization reserves the funds and converts the intent into a Payment.
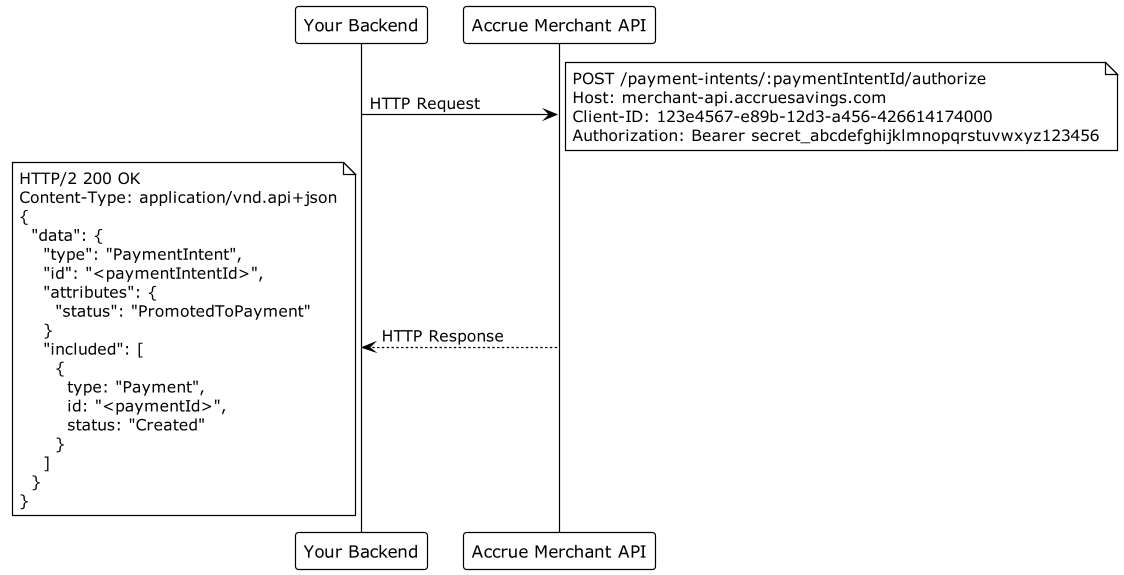
API Endpoint: POST /payment-intents/:paymentIntentId/authorize
Request:
{
  "data": {
    "type": "payment_authorizations",
    "attributes": {
      "amount": 10000,
      "currency": "USD",
      "capture_method": "automatic",
      "description": "Order #12345"
    }
  }
}
Response:
{
  "data": {
    "id": "pay_abc123xyz789",
    "type": "payments",
    "attributes": {
      "amount": 10000,
      "currency": "USD",
      "status": "authorized",
      "description": "Order #12345",
      "created_at": "2025-05-12T14:22:33Z"
    },
    "relationships": {
      "payment_intent": {
        "data": {
          "id": "pi_def456uvw123",
          "type": "payment_intents"
        }
      }
    }
  }
}
3a. Capturing a Payment (Bank Rails)
Authorized payments must be captured to initiate fund transfers. Capture can be automatic or manual, depending on your configuration.

API Endpoint: POST /payments/:paymentId/capture
Request:
{
  "data": {
    "type": "payment_captures",
    "attributes": {
      "amount": 10000
    }
  }
}
Response:
{
  "data": {
    "id": "pay_abc123xyz789",
    "type": "payments",
    "attributes": {
      "amount": 10000,
      "currency": "USD",
      "status": "captured",
      "description": "Order #12345",
      "created_at": "2025-05-12T14:22:33Z",
      "captured_at": "2025-05-12T14:25:10Z"
    }
  }
}
3b. Capturing a Payment (Card Rails - Using Virtual Debit card)
When using the card rails integration option, Accrue Pay provides a virtual debit card that you can process through your existing payment gateway.
After authorizing the Payment Intent, follow these steps to capture the payment using the virtual debit card:
Step 1: Retrieve the virtual debit card details using the secure API
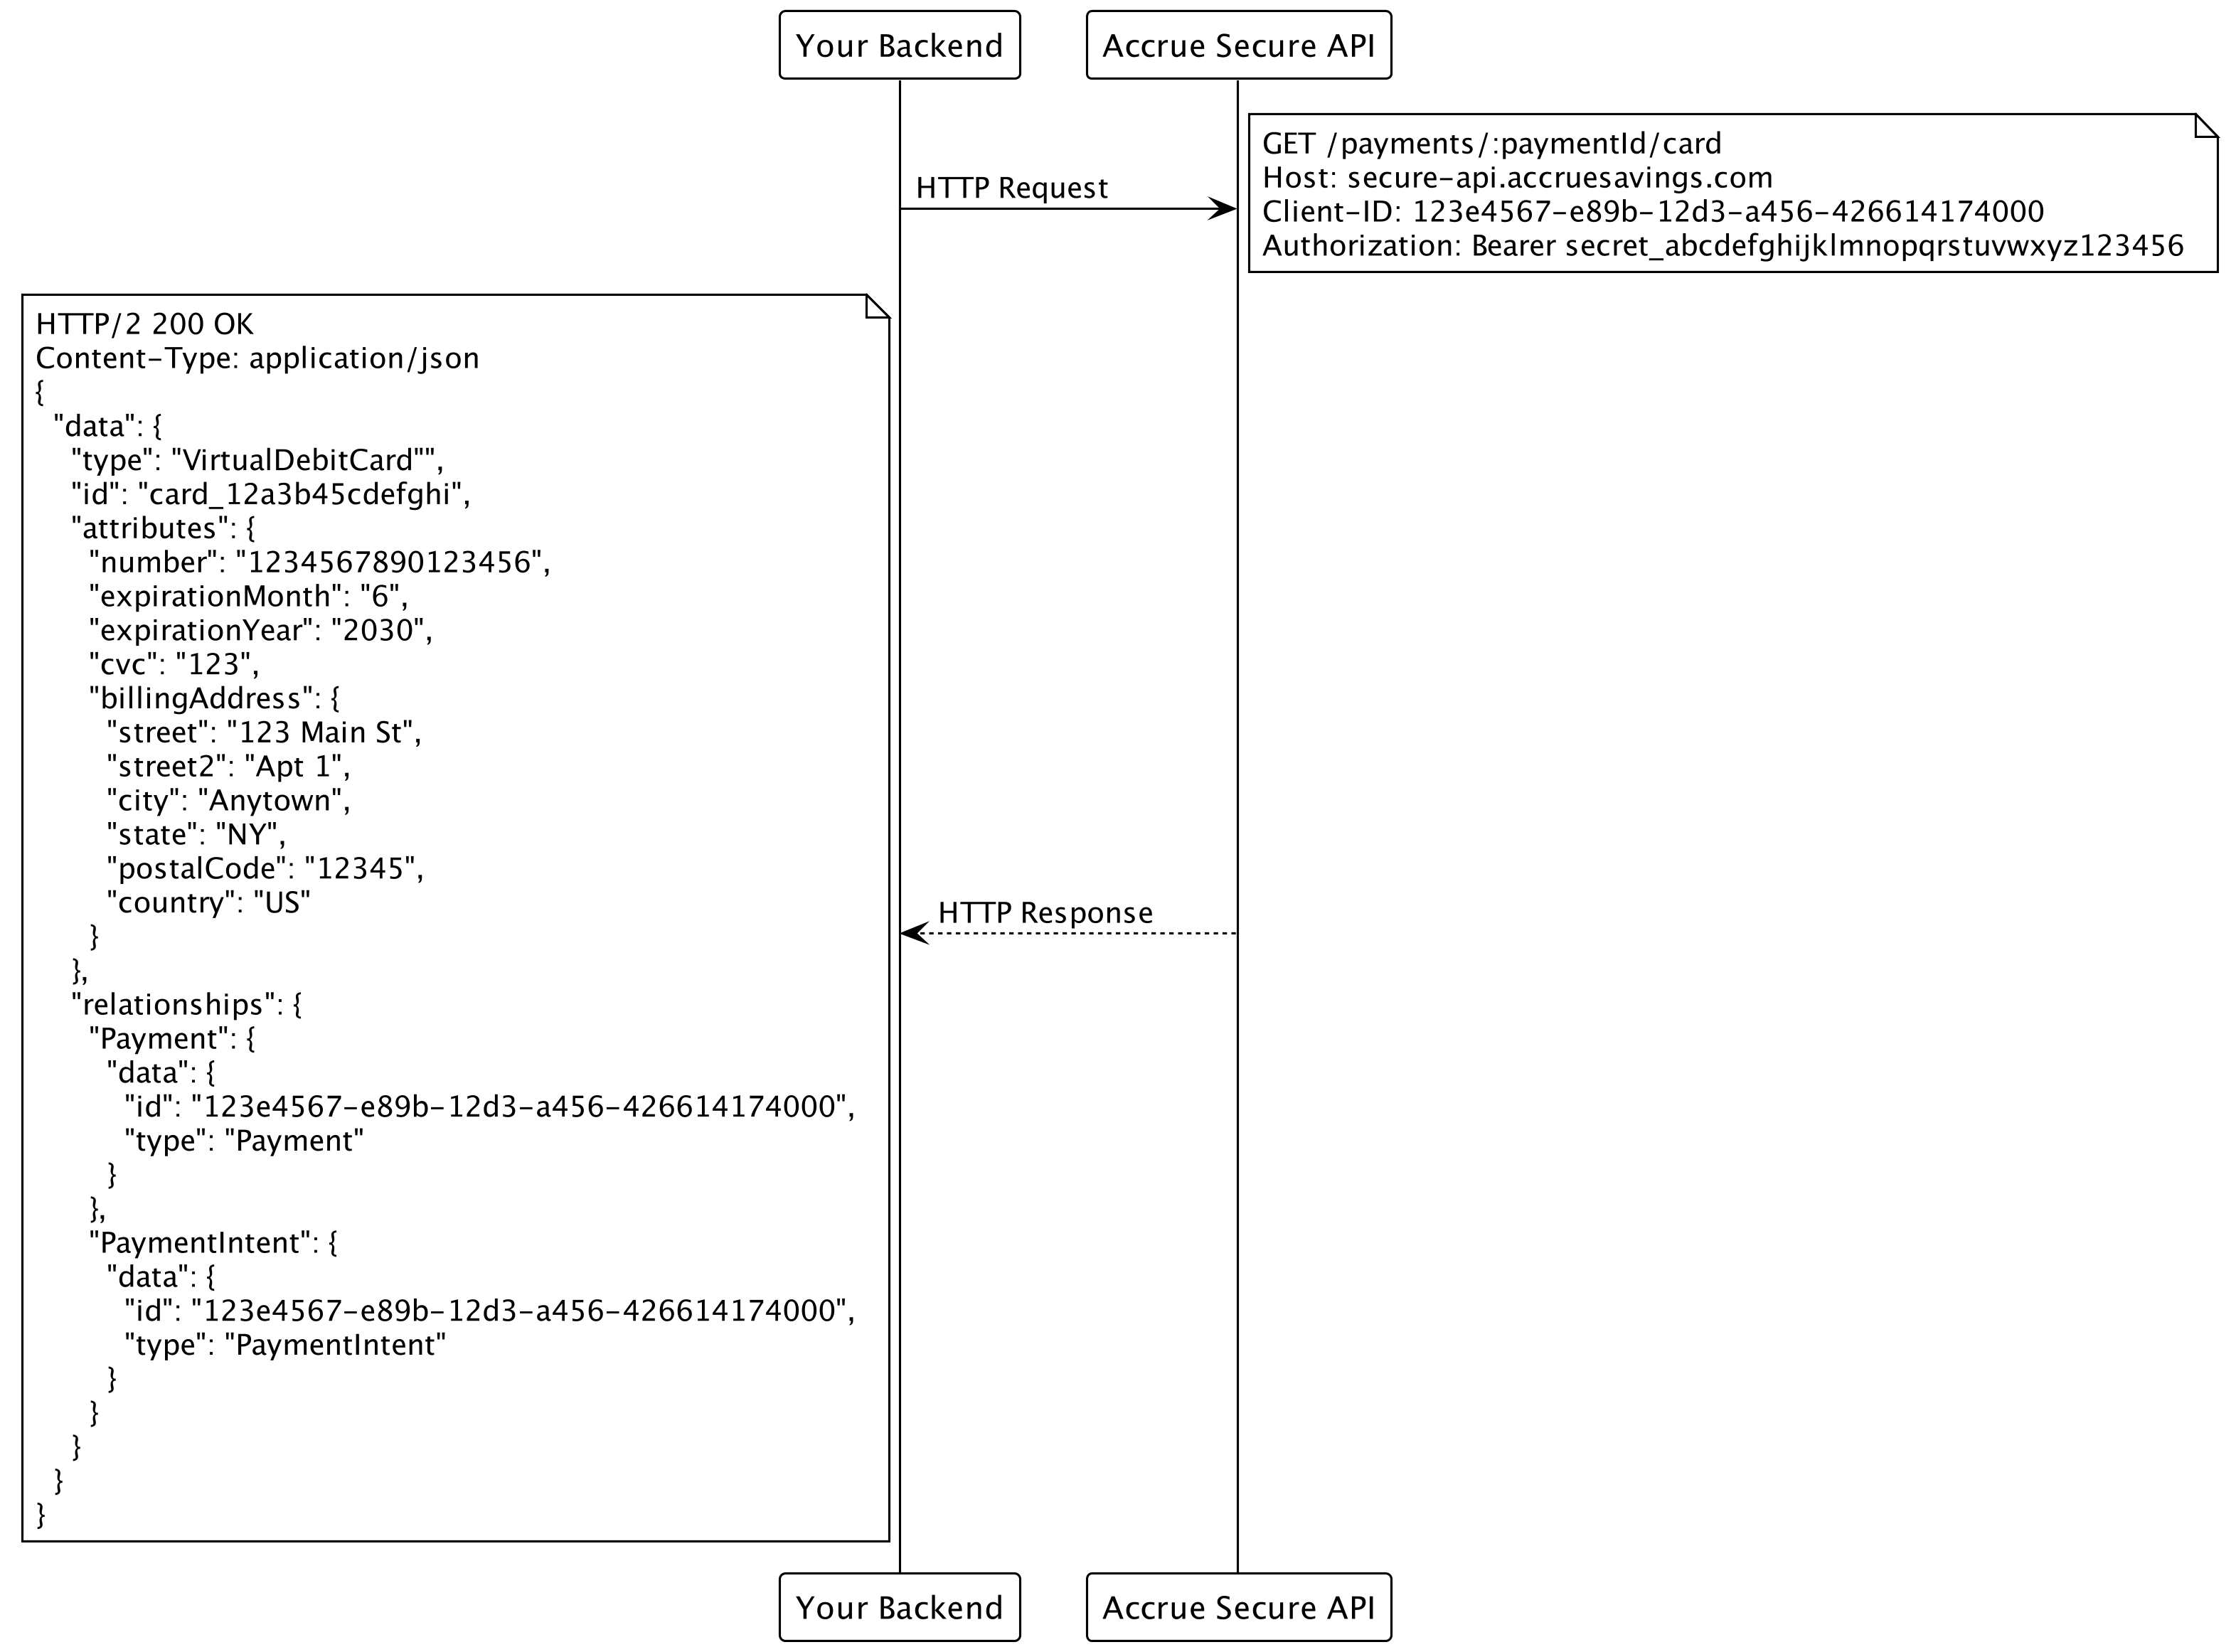
API Endpoint: GET https://secure-api.accruesavings.com/api/v1/payments/:paymentId/card
Headers:
x-client-id: your_client_id
x-client-secret: your_client_secret
Response:
{
  "data": {
    "id": "497f6eca-6276-4993-bfeb-53cbbbba6f08",
    "type": "VirtualDebitCard",
    "attributes": {
      "number": "5555555555554444",
      "expirationMonth": "6",
      "expirationYear": "2028",
      "cvc": "123",
      "billingAddress": {
        "street": "123 Main St.",
        "street2": "Apt. 1",
        "city": "San Francisco",
        "state": "CA",
        "postalCode": "94107",
        "country": "US"
      }
    },
  }
}
Step 2: Process the virtual debit card through your payment gateway
Use your existing payment gateway to process the virtual debit card details:
- Submit the card details (number, expirationMonth, expirationYear, cvc) to your payment gateway
- Use the same amount that was authorized in the Payment Intent
- Store both the Accrue Pay payment ID and your gateway's transaction ID for reconciliation
Example integration with a payment gateway:
// Example code - implement according to your payment gateway's API
const processMastercard = async (cardDetails, amount) => {
  const response = await paymentGateway.processCard({
    card_number: cardDetails.attributes.number,
    expiry_month: cardDetails.attributes.expirationMonth,
    expiry_year: cardDetails.attributes.expirationYear,
    cvv: cardDetails.attributes.cvc,
    billing_address: {
      street: cardDetails.attributes.billingAddress.street,
      street2: cardDetails.attributes.billingAddress.street2,
      city: cardDetails.attributes.billingAddress.city,
      state: cardDetails.attributes.billingAddress.state,
      postal_code: cardDetails.attributes.billingAddress.postalCode,
      country: cardDetails.attributes.billingAddress.country
    },
    amount: amount,
    currency: 'USD',
    description: 'Order #12345 (Accrue Pay Virtual Card)'
  });

  return response.transaction_id;
};
Important Notes on Card Rail Integration:
- Never store the full card details on your servers; use them only for the immediate payment processing
- Ensure your system is PCI compliant if handling card data
- The virtual debit card is a single-use card tied to the specific authorized amount
- For future payments from the same customer, you'll need to generate a new virtual card
- If needed, you can cancel the authorization by calling the
/payments/:paymentId/cancelendpoint
Payment Lifecycle
The Payment Intent and its associated Payment transition through the following statuses:
| Status | Description |
|---|---|
created | Payment Intent was successfully created |
authorized | Payment has been authorized but not yet captured |
requires_capture | Authorized with manual capture; awaiting capture |
captured | Payment successfully captured |
processing | Payment is being processed through the financial network |
succeeded | Payment completed successfully |
settled | Funds have been deposited into the merchant account |
canceled | Payment was canceled prior to capture |
failed | Payment failed due to authorization or processing errors |
Error Handling
Accrue Pay returns standard HTTP status codes along with descriptive error messages.
| Status Code | Meaning |
|---|---|
400 | Invalid request |
401 | Authentication failed |
403 | Permission denied |
404 | Resource not found |
422 | Validation error |
500 | Internal server error |
Example Error Response:
{
  "errors": [
    {
      "status": "422",
      "code": "insufficient_funds",
      "title": "Insufficient Funds",
      "detail": "The customer's account has insufficient funds to complete this payment"
    }
  ]
}
Best Practices
1. Lifecycle Management
- Persist
Payment Intent IDwith your order data - Implement retry logic for recoverable errors
- Use webhooks to track payment status updates asynchronously
2. Security Guidelines
- All sensitive operations (authorize, capture) must be backend-only
- Never expose API credentials in frontend code
- Implement idempotency keys to prevent duplicate operations
3. Testing and Go-Live Readiness
- Use the Sandbox environment for full integration testing
- Simulate both successful and failed scenarios
- Validate end-to-end flow including fund settlement before production launch
The Payment Intent architecture enables a flexible and secure integration path for handling payments with Accrue Pay. Following this implementation guide will help ensure a reliable and compliant checkout experience. See also the Merchant API Integration guide for backend authorization and capture details.
Ready to implement Accrue Pay in your application?
Contact us at info@byaccrue.com to get started